Certified Partner Program & e-Course
Earn 70% For 12 Months After Each Referral Sign Up
- Note: The Certified Partner program is intended for agencies or individuals who offer marketing services to local businesses and will likely be setting up and managing their clients' CartQ accounts, and who would therefore like to take advantage of a number of features and benefits over the affiliate program. As such, there is an expectation that Certified Partners will be directly involved in onboarding their local business referrals.
- The goal of this e-course is to give you a self-paced, comprehensive, and hands-on training of the CartQ system so that you'll be knowledgeable and feel confident in onboarding a business.
- Make sure to check out the Certified Partner Pricing & Sign Up page, and please reach out if you have any questions. Welcome!
Certified Partner Core Features & Benefits:
- Interactive e-Course & Certification
- Increased Credibility
- Higher Commission Rate (70% For 1st Year After Your Referral Signs Up, Then 30% Lifetime Thereafter)
- Personalized Strategy Call Page
- Client Manager & Fast Switching Between Clients
- Notifications When Your Client Completes Important Steps
Certified Partner Program
- Program Overview
- Core Features & Benefits
- Commission Structure
- Certification Overview
- Certified Partner Sign-Up Task
- Upload Certified Partner Logo Task
- Payout Integration
- Upload W9
Essentials
- CartQ Sign-Up Task
- Upload Logo Task
- Create Primary Location Task
- Payment Integration
- Review Users & Notifications
- Find & Register Phone Number
- Submit 10DLC Profile For Text Messaging
Set Up
- Review Account Settings
- Media Categories Task
- Media Library Task
- Predefined Offer Descriptions Task
- Custom Tags Task
- Review Forms Task
Purchased Offers
- eGift Cards Task
- Certificates Task
- Discount Cards Task
- Subscription Boxes Task
- eGift Options, Themes & PDFs
- Marketing Blasts
Free Sign Up Offers
Come Back Soon
Points & Rewards
Reservations & Waitlist
- Reservations Task
- Reservation Labels Task
- Reservation Schedules Task
- Reservation Block-Outs Task
- Join Waitlist Task
Options & Fulfillment
- Common Offer Options
- No App Required - Works via Email & Text
- Certificate Redemptions Task
- Business Page
Communications
Certified Partner Leads
Program Overview
- Note: The Certified Partner program is intended for agencies or individuals who offer marketing services to local businesses and will likely be setting up and managing their clients' CartQ accounts, and who would therefore like to take advantage of a number of features and benefits over the affiliate program. As such, there is an expectation that Certified Partners will be directly involved in onboarding their local business referrals.
- The goal of this e-course is to give you a self-paced, comprehensive, and hands-on training of the CartQ system so that you'll be knowledgeable and feel confident in onboarding a business.
- Make sure to check out the Certified Partner Pricing & Sign Up page, and please reach out if you have any questions. Welcome!
Core Features & Benefits
- Interactive e-Course & Certification
- Increased Credibility
- Higher Commission Rate (70% For 1st Year After Your Referral Signs Up, Then 30% Lifetime Thereafter)
- Personalized Strategy Call Page
- Client Manager & Fast Switching Between Clients
- Notifications When Your Client Completes Important Steps
Commission Structure
- The initial commission rate for Certified Partners is 70% for the first 370 days after your referral signs up.
- After 370 days, the commission rate changes to 30% for the remaining lifetime of the account (which is the same as for an affiliate).
- If your account is cancelled, or it's suspended due to billing failure, you'll automatically drop down to the affiliate commission rate of 30% for any transactions that occur while your account is delinquent.
- Once your account is reactivated, the certified partner commission rate of 70% will be restored for applicable transactions.
- Commissions will be paid via Stripe. (You'll be able to add a U.S. bank account via the Stripe onboarding wizard.)
- U.S. based affiliates are required to enter a Tax ID so we can file the 1099-NEC, if necessary.
- Commissions are only paid on the fixed monthly rebill amount (no commissions are paid on Twilio phone & SMS charges, etc..).
- No commission is paid on any transaction that is $10 or less (trials, etc..).
Certification Overview
- Certified Partner & CartQ Accounts: The e-Course contains some tasks that will be completed within your Certified Partner account and some tasks that need to be done within a CartQ Business account.
- Certified Partner Sign Up: The e-Course requires signing up for a Certified Partner account and a CartQ Business account (preferably in that order), and the two accounts will work in tandem to complete the e-Course.
- CartQ Sign Up: If you sign up for your Certified Partner account first, you should click on your Referral Link before signing up for your CartQ Business account so that it will be linked as a referral automatically.
- Note: All the steps can be completed during the trial period of the CartQ Business account.
- Make Sure They're Linked: Within your Certified Partner account, click on Clients, and you should now see your CartQ Business account listed there. If you don't see it there, copy the 20-Digit Account ID from your Account Settings page, then log into your CartQ Business account, go to Account Settings and paste it into the '20-Digit Certified Partner ID' field.
- Enable e-Course: In your Clients list, click the Options button for your CartQ Business account and choose Enable e-Course. This tells the system that you are using that CartQ Business account in tandem with your Certified Partner account in order to complete the e-Course.
- Review Tasks: Now click Home > e-Course within your Certified Partner account and you will see 'Task' tags next to items where there's something that need to be completed (outlined in the 'e-Course:' square at the bottom of each section).
- Complete Tasks: As you work through and complete the tasks, the items will show as 'Completed' both on your CartQ Business account Onboarding page and also within your Certified Partner account e-Course page.
- Automatic Certification: When all 'Task' tags show as 'Completed' in your Certified Partner account, the e-Course will be officially finished and your account will be automatically certified and fully activated.
- Enable 2FA: You'll want to enable Two-Factor Authentication (2FA) on your Certified Partner account (User Profile > 2FA Settings). This is a security requirement in order to enable the fast Login buttons in your Clients list.
- Fast Switching: On your Clients page, the Login button should now be activated. You can now switch back and forth between the two accounts, as needed, as you work through completing the steps.
- Tip: You may want to spend most of your time in the CartQ Business account and work off of that Onboarding page (keeping in mind that that's exactly what your clients will see), while switching back to your Certified Partner account periodically to see any e-Course task directives.
In Depth:
Certified Partner Certification Overview

Certified Partner Sign-Up Task
- Visit the Certified Partner Pricing & Sign Up page and sign up for an account, preferably before you sign up for a CartQ Business account.
Upload Certified Partner Logo Task
Go To: Set Up > Account Settings > Account Logo
- Upload your Certified Partner company logo.
- Tip: If you don't have a logo, visit a site like FreePik.com and search for a free sample logo to use temporarily so you can see where it's placed, etc.., as you work through the e-Course.
Payout Integration
Go To: Set Up > Payout Integration > Launch Stripe Onboarding
- This will allow you to add your bank account in order to receive payments.
Upload W9
Go To: Set Up > Account Settings > Upload W9
- We will need your W-9 form if you are U.S. based so that we can send you payments to your bank account (via Stripe).
CartQ Sign-Up Task
- Sign Up for a CartQ Business account.
Upload Logo Task
Go To: Set Up > Account Settings > Account Logo
- Upload a .png or .jpg image. A square-shaped or landscape-oriented transparent .png that has a width of 500px or more will have the best visual appeal.
- At a minimum, the logo is necessary because of all the features in the system that expect to have some type of image.
- However, once you upload your logo, you don't really need to upload any other images into CartQ if you don't want to, since the default settings throughout the system will be just to show your logo, and it will work fine by itself.
Create Primary Location Task
Go To: Set Up > Locations
- At a minimum, you'll want to set up your primary location.
- If you have more than one location, you can add your other locations as 'secondary' locations.
- If you have more than one location set up, the system will allow you to choose the location when transferring a certificate to staff or when completing a redemption.
- You can add more secondary locations to your plan by clicking your username in the top right menu > Current Plan > Add the number of Extra Secondary Locations
Payment Integration
Go To: Set Up > Payment Integrations > Choose Stripe or PayPal > Complete Onboarding Button
- A Stripe or PayPal integration is required in order to accept payment for eGift Card, Certificates, Discount Cards & Subscription Box offers.
- You can set up one integration for Stripe and one integration for PayPal, but you can only have one or the other active for checkout at any given time. Having both can be helpful in order to experiment and determine the merits of each one, or to have one as a back up that you can switch over to in case you have an issue with the other. However, you only need to have one.
- When you choose Stripe or PayPal, you'll see a button to complete the onboarding process. When you're finished onboarding with Stripe or PayPal, you'll return back to the same page and it will show that the integration has been completed.
In Depth:
Payment Integration
Review Users & Notifications
Go To: Set Up > Users & Notifications
- Review Your Notification Settings: You can also turn off SMS notifications during off-hours.
- Secondary Users: Set up a secondary user for each of your staff members and decide whether or not to give them Full or Limited account access, and also participation in Communications and/or Redemptions.
- Send Login Information: Checkmark to email or text your secondary users their login information.
- Personal Login Page: They can bookmark their Personal Login Page on their phone home screen and quickly login with just their Security PIN.
- Certificate Redemptions: If they are activated for handling redemptions, their login info email will also have a Certificate Redemptions document button and PDF attached for their review.
- 2FA: For added security, consider enabling Two-Factor Authentication (2FA) for the primary user and any secondary users with full access.
- Note: For staff with limited access, you may prefer to leave 2FA off, allowing them to log in quickly through their Personal Login Page.
In Depth:
Users & Notifications
Find & Register Phone Number
Go To: Set Up > Account Settings > Dedicated Phone Number > Click 'Find & Register Phone Number' Button
- In order to take advantage of the two-way text messaging functionality, your account will get its own dedicated phone number.
- Start by entering your area code and an optional 'vanity' phrase.
- You'll then be able to pick the one you want from a list of available numbers that match your criteria, or you can go back to try a new search.
In Depth:
Find & Register Phone Number
Submit 10DLC Profile For Text Messaging
Go To: Set Up > 10DLC Profile
- 10DLC stands for 10-digit long code. The 10DLC profile registration process was introduced 2021 and provides a way for businesses to register their phone numbers with the carriers in North America.
- It legitimizes the SMS messages that are sent out on your dedicated phone number so they aren't filtered or blocked, even when they may contain links or other marketing-related content.
- You'll be notified via email when your 10DLC Profile is approved, which can take several days on up to a week.
In Depth:
Submit 10DLC Profile For Text Messaging
Review Account Settings
Go To: Set Up > Account Settings
- Take a moment to review your account settings. Most are self-explanatory, but a few are worth highlighting here.
- Business Page Theme: Choose between Dark/Light/Auto for your business page theme, and choose a theme color.
- Points & Rewards: Decide if you want Points & Rewards enabled or disabled for your account. If you don't plan to use it, we recommend disabling it to avoid showing irrelevant links to customers, logging unnecessary points, or sending non-applicable emails
- Full Subtotal Amount: Staff members enter the 'Full Subtotal Amount' for each redemption. This is the subtotal from the customer's receipt, before deductions or discounts are applied. You can customize the label for this field to match your business terminology.
- Note: The 'Full Subtotal Amount' is used for reporting and determines the number of points a customer earns per visit - if the Points & Rewards feature is enabled.
- Maximum Subtotal Threshold: You can also set a 'Maximum Subtotal Threshold' so that you can be alerted if a staff member makes a mistake and enters a really high number, so your reporting isn't skewed and so the customer doesn't receive points in error.
In Depth:
Account Settings
Media Categories Task
Go To: Set Up > Media Categories
- Media Categories are just a way to classify the media files you've uploaded into your account.
Media Library Task
Go To: Set Up > Media Library
- Your Media Library is where you can upload images for your business that you want to use as background images for offers.
- When editing an offer, discount card square, calendar card square or subscription box item, you'll have the option to pick an image from your Media Library, so you'll want to add your images to the Media Library first before you edit an offer.
- Note: When cloning various items, images uploaded specifically to an item via one of the Upload Image options are not cloned, whereas the Media Library Image options are cloned. For this reason, and as a general convenience, it is recommended that you add any commonly-used images to your Media Library first and then choose one of the Media Library Image options.
In Depth:
Media Library
Predefined Offer Descriptions Task
Go To: Set Up > Predefined Offer Descriptions
- The title of an offer has limited characters, but the description does not, so the description is where you'll have all the details and restrictions for the offer.
- The complete offer description is the Custom Description followed by the Predefined Offer Description.
- Custom Description: This is where you'd fill out the details of the specific offer, like what it includes, if it can't all fit in the title. For example: 'Family Pleaser includes...'
- Predefined Offer Description: This is where you'd have the universal language that applies to all offers, so you can maintain it in just one place rather than copying/pasting the same thing across numerous offers. Examples: Promotional value must be used in 1 visit. Limit 1 special offer per visit. Valid for dine-in only. Sunday through Thursday only. Excludes holidays.
- Note: The complete offer description is 'stamped' to each certificate at the time of purchase or sign up so that you can safely update your offer descriptions later on without upsetting customers who purchased or signed up under certain terms and expectations.
Custom Tags Task
Go To: Set Up > Custom Tags
- Custom Tags allow you to tag your patrons based on certain actions they take or certain thresholds they cross. You can then send offers only to patrons who have certain tags.
- There are three types of tags that are applied to a patron based on a threshold they've crossed. For each threshold type, you most likely would want to create several different tags at different thresholds.
- All-Time Reward Points: Patrons will be tagged with this tag when their 'All-Time Reward Points' matches or exceeds this threshold, and will be untagged from any other tags that have a lower threshold set.
- All-Time Check-Ins/Redemptions: Patrons will be tagged with this tag when their all-time combined total number of check-ins and redemptions matches or exceeds this threshold, and will be untagged from any other tags that have a lower threshold set.
- Last Review Sentiment: Patrons will be tagged with the tag that matches the sentiment of the last review they submitted.
- General: This type of tag is for when you want to apply your own custom classification. For example, you could create a holiday gift card tag, where everyone who buys a certain eGift Card is tagged as such.
In Depth:
Custom Tags
Related:
Common Offer Options
Review Forms Task
Go To: Set Up > Review Forms
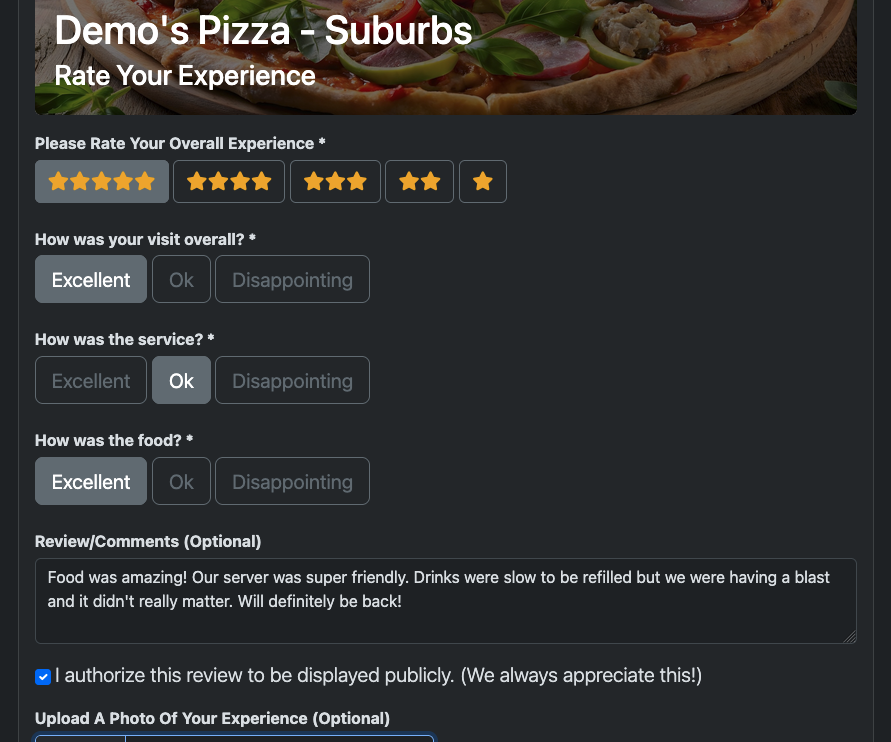
- Review forms allow you to collect feedback from customers on the experience they had during their visit.
- Add up to three custom questions.
- A Splash Graphic is generated for positive reviews (4-5 stars), if no image was uploaded by the customer, to provide a nice image for when the review is shared on social media
- You can send a special Bounce Back offer and display a thank-you page customized to both positive (4-5 stars) and negative (1-3) reviews.
- Positive reviews can have buttons to link to the various review sites so they can copy and paste the review they just created into other review sites, like Google Reviews, Yelp, etc..
- After a certificate is redeemed for an offer that you have a review form tied to, the customer will be redirected to the review form page so they can rate their experience and/or leave a review. They can optionally upload a photo of their experience.
- You can easily moderate reviews from the admin panel, and you can share select reviews on social media.
- Your positive reviews that have been authorized by the customer to display publicly will be shown on your Reviews page for other visitors to see.
In Depth:
Review Forms
Demo: See Demo
eGift Cards Task
Go To: Offers > eGift Card
- eGift Cards function like traditional, physical gift cards, in that they carry a balance and don't have to be used all at once.
- eGift Cards are always sold for the face value of the card, just like for a physical gift card. Any discount or incentive that you want to offer is done in the form of a bonus amount.
- If you offer a bonus value, purchasers who are giving this as a gift will have the option to keep the bonus eGift Card for themselves or give it to the gift recipient.
- You can specify the maximum quantity that the customer can purchase in one order. For example, if a customer purchases a $50 eGift Card and chooses a quantity of 2, one $100 eGift Card would be issued.
In Depth:
eGift Card Offer
Demo: See Demo
Certificates Task
Go To: Offers > Certificate
- Certificates usually represent some type of deal. Certificates are different from eGift Cards in that there is no running balance; the entire 'deal' needs to be redeemed on one visit.
- There are three types of Certificates you can create: Single, Flexible & Fixed.
- Single: One Certificate Per Order.
- Flexible: Customer Can Choose Their Desired Quantity.
- Fixed: Predetermined Quantity Per Order. This is useful for bundles, where you want them to have to buy so many in order to get the deal. For example: 'Get two $25 Certificates for $40', 'Get a 10-Visit Punchcard for $100'.
In Depth:
Certificate Offer
Demo: See Demo
Discount Cards Task
Go To: Offers > Discount Card
- A discount card is a collection of certificates that is sold for deeply-discounted price, compared to the amount that could be saved.
- The great thing about the discount card is that you are essentially selling a stack of coupons, typically for $20-$25.
- You get the sale on the front end, whether they use it or not, and if they do use it, you can also make profit on each visit.
- On the Splash Page and Checkout Page, the key information is automatically displayed, including the total amount saved and the expiration date, if applicable.
In Depth:
Discount Card Offer
Demo: See Demo
Related:
Business Cards - Set Up
eGift Options, Themes & PDFs
Calendar Card Offer
Marketing Blasts
Certificate Redemptions
Common Offer Options

Subscription Boxes Task
Go To: Offers > Subscription Box
- Subscription Box Offers work like a physical product subscription box: The customer pays up front for a 3, 6 or 12 month subscription, and they will receive a new certificate at the frequency you choose.
- You can choose to send a certificate out at one of these three frequencies: Once Per Month, Every Two Weeks (Up to 2 Times Per Month) or Weekly (Up to 4 Times Per Month).
- Box Item Certificates will be sent in sequence based on their Cycle Position. The cycle will start over at the beginning as many times as necessary to fulfill the 3, 6 or 12 month duration that the customer selected.
- Example 1: Offer your 3 best deals, send a certificate once per month, and charge $10 per month, so it would be $30 for 3-months, $60 for 6-months, etc..
- Example 2: Offer a Chips & Salsa subscription box, where a customer can pay $100 and get free chips & salsa every week for a year.
In Depth:
Subscription Box Offer
Demo: See Demo

eGift Options, Themes & PDFs
- On the checkout page for any of the four purchased offer types (eGift Cards, Certificates, Discount Cards & Subscription Boxes), the buyer will have several additional options relating to gifts:
- Send This As A Gift To Someone Else: The buyer can add the Name and Email of the recipient and an optional note, and can optionally choose to have it sent out at a later date.
- Choose A Gift Certificate Theme: If a theme is chosen, a Gift Certificate PDF will be generated and emailed.
In Depth:
eGift Options, Themes & PDFs
Marketing Blasts
Go To: Reports > Marketing Blasts
- Marketing Blasts provide a way to send out an email and text message to your entire list on a one-time or recurring basis, in order to promote a sale of an eGift Card, Certificate, Discount Card or Subscription Box.
- This allows you to set up all of your monthly, quarterly or holiday promotions ahead of time, complete with a checkout window (a timeframe where the customer can purchase), maximum quantity sold restriction and 'Sale Ends Soon' reminders.
- Send One Time or Immediately: This is just when you want to queue it up to go out sometime in the future (or immediately), and just send it one time only.
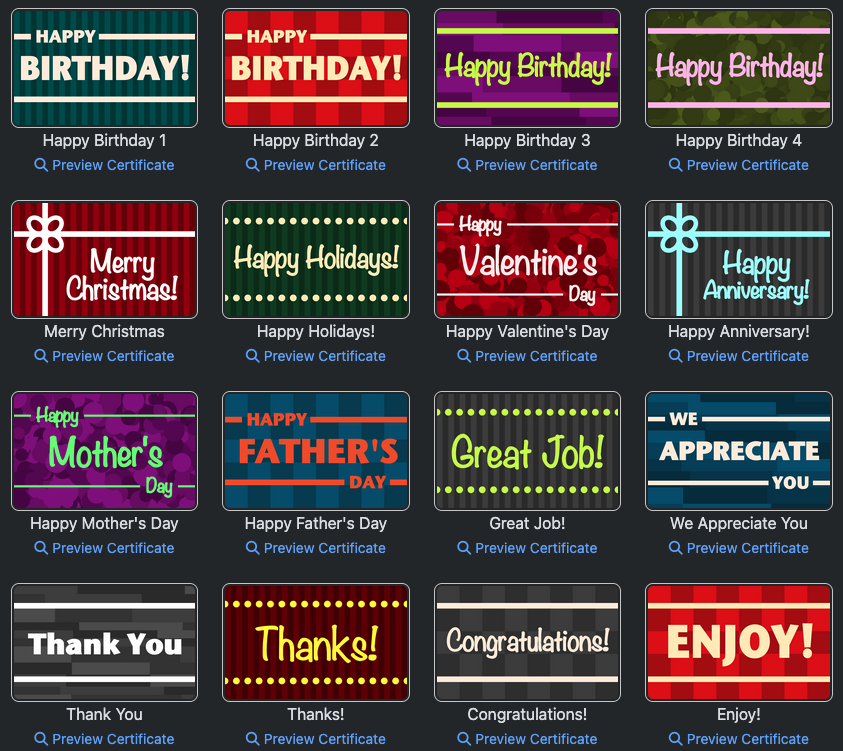
- Yearly Holiday: If you choose Yearly Holiday, you can pick from some of the most popular holidays and the system will send it out yearly. You can specify how many days to send it out before the holiday.
- Repeating Interval: If you choose repeating interval, you can pick from a variety of interval schedules, like Monthly, Bi-Monthly, Quartly and Yearly.
- The system will automatically maintain the checkout window and maximum quantity sold sales restrictions based on your marketing blast schedule:
- Checkout Window: Select the number of days after the send date that we want the Checkout Window to last.
- All-Time Maximum Quantity Sold: Cap the number of sales. For example, you can limit the number of eGift Cards sold per month to 20.
- Checkout Window and Max Qty Sold Within Window: Enforce a Checkout Window, but if the quantity sold reaches the maximum before the checkout window ends, the system will prevent any additional sales.
- We can choose to send our Marketing Blast to everyone, or only to a certain group of recipients, based on our Custom Tags.
- Send out up to three 'Sale Ends Soon' reminders per marketing blast.
In Depth:
Marketing Blasts
Sign-Up Gifts Task
Go To: Offers > Sign-Up Gift
- A sign-up gift offer is like a squeeze page - it's the type of offer you will want to use when you are trying to incentivize someone to sign up as a patron for the first time, or when you are just running a squeeze-style promotion on your website or social media.
- CartQ can use Sign-Up Gift offers as a way to incentivize sign-ups for your Join Waitlist offers and your points offer.
- You can decide whether a patron can sign up once per lifetime or only one at a time.
- If you utilize QR Codes at your tables (to direct people to your online menu, for example), you can use a sign-up gift splash page to offer the customer an option of choosing to view your online menu or signing up for the free gift.
In Depth:
Sign-Up Gift Offer
Demo: See Demo
Related:
Text-Us Website Bubbles
Points Entry Offer
Join Waitlist Offer
Certificate Redemptions
Common Offer Options

Business Cards - Set Up Task
Go To: Set Up > Business Cards
- Business Cards are used for the very bottom row on the Mailer PDF for Discount Cards or Calendar Cards.
- For example, you could co-op with a real estate agent or insurance agent for mailing out a Calendar Card via USPS Every Door Direct Mail.
- The main benefit of the Calendar Card to the local business professional is that the recipient will be more likely to keep it and put it on their fridge instead of just pitching it in the garbage.
- Within the 'PDF Mailer' section when editing a Discount Card or Calendar Card offer, there is an option called Bottom Strip Type, with two choices: Headline & Subheadline or Business Card. Choose Business Card and Save.
- Download the 8.5x11 Mailer, make any needed adjustments to your data and resave. Upload the Calendar Card PDF to a mailing service to mail out to local homes in your area.
In Depth:
Business Cards - Set Up
Related:
Discount Card Offer
Calendar Card Offer

Calendar Cards Task
Go To: Offers > Calendar Card
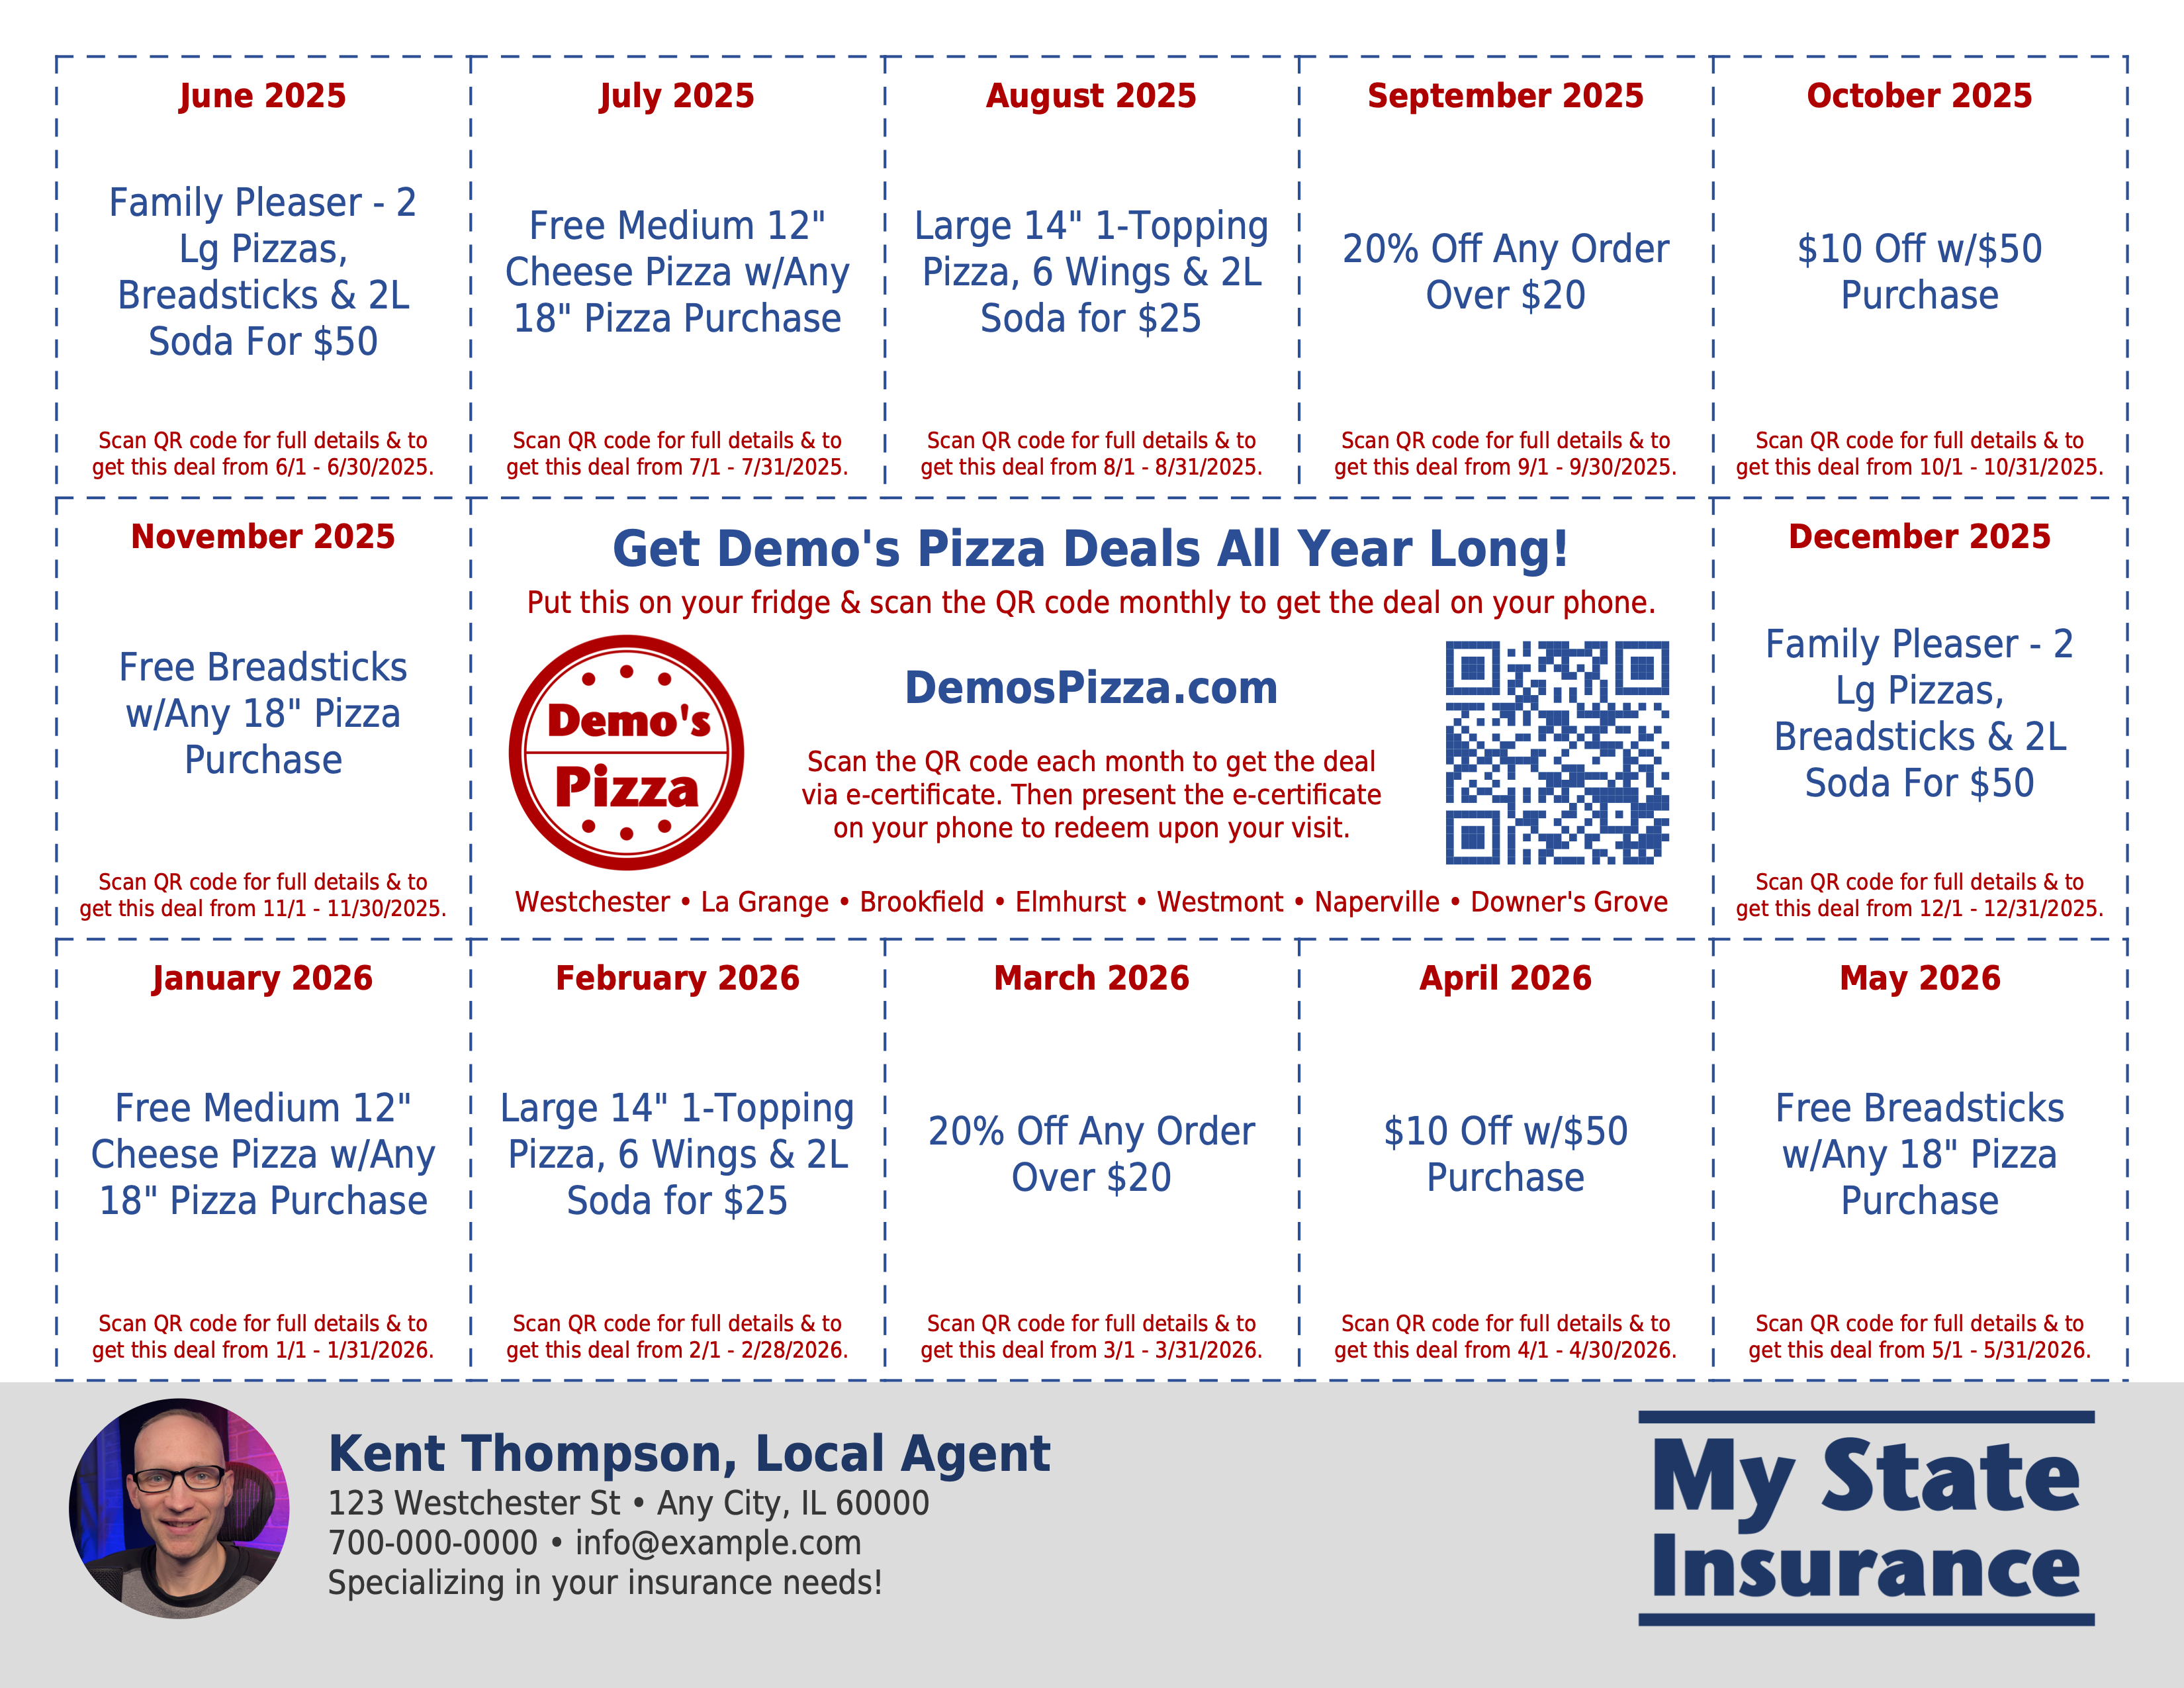
- A Calendar Card is an 8.5x11" flyer or postcard with one special offer for each month of the year that you can directly mail to homes or conveniently print and distribute at your location for use as placemats, bag stuffers or even having a stack at your counter.
- The idea is this: By mailing one postcard with 12 offers on it, representing one offer per month, the recipient might be more likely to put the postcard on their fridge in order to get the deals throughout the year.
- In order to share in the mailing cost, you could co-op with a real estate agent or insurance agent for mailing out a Calendar Card via USPS Every Door Direct Mail.
- Ideally you'll want to add 12 squares (one per month), but if you don't have 12, the system will repeat offers as necessary.
- You can indicate the month that the offer should be used for, which allows you to run seasonal offers, like for St. Patrick's Day, Mother's Day, etc..
- The bottom strip can be customized with a business card that you've previously created, or it can have a headline and subheadline.
- Upload the Calendar Card PDF to a mailing service to mail out to local homes in your area. You can mail out any time of year and the system will automatically reposition the offers.
In Depth:
Calendar Card Offer
Demo: See Demo
Bounce Back Offers Task
Go To: Offers > Bounce Back
- The purpose of Bounce Back Offers is to get the customer to come back soon, and they are sent out in response to some type of action that the customer took, like redeeming an offer or filling out a review form.
- You can choose to send out the offer immediately or after a few days, and you can set the time of day to send, if not immediately.
- Add a custom note, or leave blank to use the default: Enjoy this complimentary certificate on your next visit!
- You'll notice various places throughout the system where you can choose a Bounce Back Offer to send out after taking a certain action.
In Depth:
Bounce Back Offer
We Miss You Offers Task
Go To: Offers > We Miss You
- If a customer hasn't interacted with the system for a certain period of time (1 month, 2 months, 6 months, etc..), you can have a We Miss You Offer go out to them.
- An interaction is counted when they sign up for a new offer, redeem an offer, fill out a review form or submit a text message through the communications system.
- Each time they interact with the system in one of those ways, their 'interaction timer', if you will, is reset. So, as long as they continue to interact, they won't get these offers.
In Depth:
We Miss You Offer
Give Away Offers Task
Go To: Offers > Give Away
- Give Away Offers are what you'd use if you want to blast an offer out to your entire list, like if you're having a special event, promotion or for an upcoming holiday.
- The system will automatically create a certificate for each recipient when a Give Away offer is sent out.
- Send One Time or Immediately: This is just when you want to queue it up to go out sometime in the future (or immediately), and just send it one time only.
- Yearly Holiday: If you choose Yearly Holiday, you can pick from some of the most popular holidays and the system will send it out yearly. You can specify how many days to send it out before the holiday.
- Repeating Interval: If you choose repeating interval, you can pick from a variety of interval schedules, like Monthly, Bi-Monthly, Quartly and Yearly.
- You can view the Blasts that are associated with a particular offer by clicking the View button in the Blast Schedule column, or click Reports > Marketing Blasts to view all.
In Depth:
Give Away Offer
Celebration Offers Task
Go To: Offers > Celebration
- Celebration Offers can be for a Birthday, Half-Birthday or Anniversary.
- You can choose how many days before the special day to send the certificate, and at what time of day.
- Enter a custom email note to go right above the green button in the email.
In Depth:
Celebration Offer
Enable Points & Rewards
Go To: Set Up > Account Settings > Points & Rewards
- This step is just to ensure that you have Points & Rewards enabled on your account.
- If you don't plan to use Points & Rewards, we recommend disabling it to avoid showing irrelevant links to customers, logging unnecessary points, or sending non-applicable emails.
Local Check-In Task
Go To: Offers > Local Check-In
- The local check-in offer is a type of offer that is meant to be displayed on a TV or tablet at your location. Customers can scan the QR code and enter their email or phone to receive their points.
- Note: The Check-In Page URL should be kept private and only loaded on devices that you control, in your location, in order to prevent people from getting check-in points at-will, from any location.
- The number of points received per check in should be equivalent to a dollar amount (1 Point = $1). For example, if simply showing up and checking in is worth $5 of spending, enter 5 points received per check in.
- Existing customers will be prompted to enter their email or phone, or if they're already logged in, it will automatically award their points.
- New customers can be redirected to a simple registration page to receive their points upon registration.
- Alternatively, you can specify a Sign-Up Gift Offer for new customers as an incentive to sign up, like free breadsticks, free chips & salsa, etc.., so they can receive something tangible on their visit.
In Depth:
Local Check-In Offer
Demo: See Demo
Related:
Common Offer Options

Points Entry Task
Go To: Offers > Points Entry
- The Points Entry Offer is the offer that's used for staff members to enter points for a customer when the customer doesn't have any other offer they are redeeming on that visit.
- Each patron receives a unique points entry certificate upon any type of registration as a patron (Sign-Up Gift, eGift Card sale, etc..).
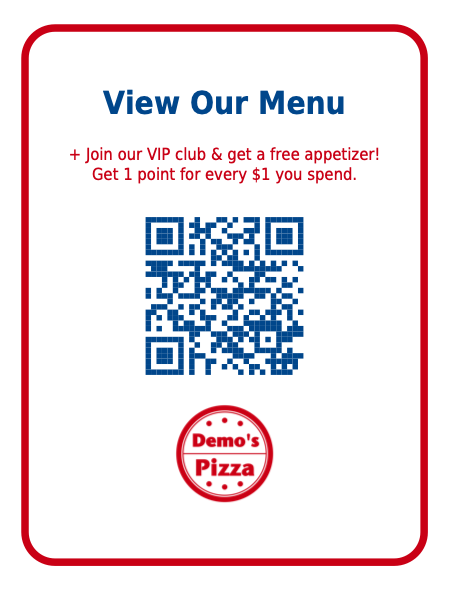
- You can offer a Sign-Up Gift as incentive to join. For example: 'Get 1 point for every dollar you spend. One certificate redemption or points entry per visit. New customers will receive a free appetizer for signing up!'
- Print flyers with QR Codes at various sizes for use in table tents, etc...
- When the customer scans the QR code, they can optionally view your online menu or join your reward program to receive their Sign-Up Gift, or simply earn their points via a redemption on their Points Entry certificate by a staff member.
In Depth:
Points Entry Offer
Demo: See Demo
Related:
Sign-Up Gift Offer
No App Required - Works via Email & Text
Certificate Redemptions
Common Offer Options
Rewards Earned Task
Go To: Offers > Reward
- Reward Offers are the type of offer that a patron can get with the points that they've earned.
- One point earned is the same as one dollar, so if a customer spends $100, they'll receive 100 points.
- Example 1: Earn 200 points and receive a free appetizer.
- Example 2: Earn 500 points and receive a free entree.
In Depth:
Reward Offer
Demo: See Demo
Related:
Common Offer Options

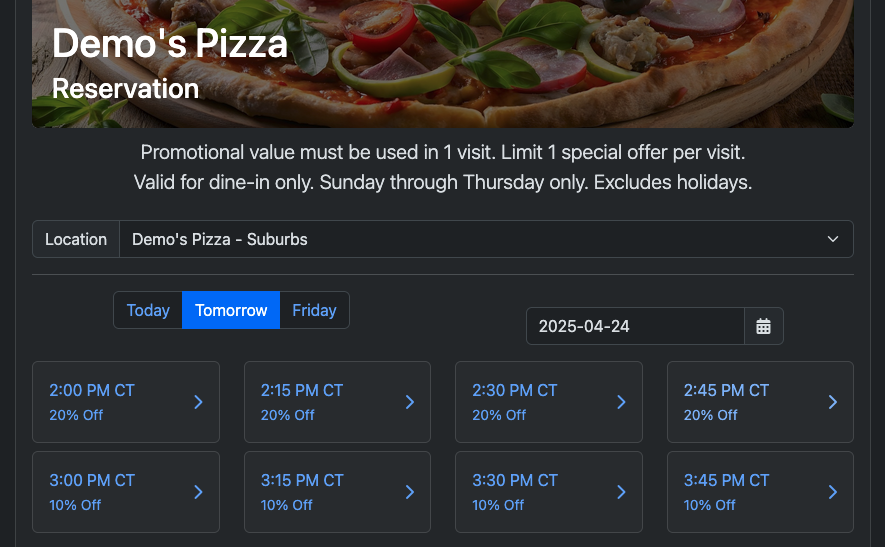
Reservations Task
Go To: Offers > Reservation
- Reservation Offers allow customers to make a reservation, but also provide a way to fill slow times by offering an incentive on certain days of the week and times of day.
- For example, you can offer a reservation that comes with a discount of 10% off at 2pm, but regular pricing during primetime.
- It's important to set up our Reservation Labels first, and then Reservation Schedules, and then our Reservation Offer, in that order. So, you may want to advance to those steps and then come back here.
- Once our Reservation Labels and Schedules are set up, and optionally Reservation Block-Outs, we can create our Reservation Offer and select the Schedules that apply.
- Customers can click to make a reservation from our Business page, our Website Bubble, or a special link we can post on our website, or social media, etc..
- After a customer makes a reservation, the system will create a reservation certificate, sending out the accompanying email and text message and allowing us to reschedule or cancel.
- Under Links > RSVN/Waitlist staff can view and fulfill our reservations, or customers can conveniently present their certificate to staff.
In Depth:
Reservation Offer
Demo: See Demo
Reservation Labels Task
Go To: Set Up > Reservation Labels
- Reservation Labels simply indicate what deal the customer is going to get, if anything, for a particular time slot.
- For example, we can call our Reservation Labels: Prime Time, 10% Off, 20% Off, etc..
- And for our descriptions, we can enter: 'Enjoy our regularly-priced menu items' or 'Take 10% off food and non-alcoholic beverages', etc..
In Depth:
Reservation Offer
Demo: See Demo
Reservation Schedules Task
Go To: Set Up > Reservation Schedules
- Reservation Schedules are how we can designate what Reservation Labels apply to certain days of the week and times of day, and at which locations.
- For example, we can create a Reservation Schedule for our slowest days of the week, Monday-Thursday, from 2-3pm, for our Downtown location, and another schedule for all of our remaining Prime Time reservation slots.
- We can specify the limit of how many reservations can be made for each time slot.
In Depth:
Reservation Offer
Demo: See Demo
Reservation Block-Outs Task
Go To: Set Up > Reservation Block-Outs
- Choose any holidays, pseudo-holidays or custom dates that we don't want to offer reservations on, and the specific location that it applies to, or all locations.
- The system will continually refresh the next occurrence for each block out so that that day will be excluded from reservations ongoingly.
In Depth:
Reservation Offer
Demo: See Demo
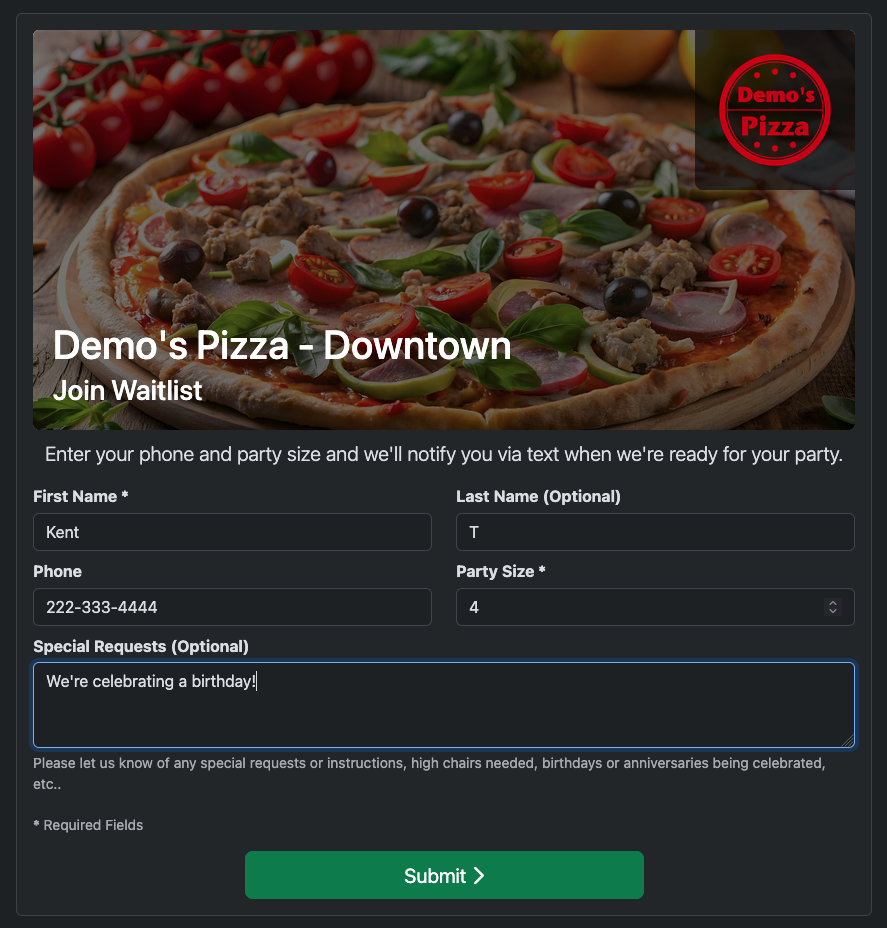
Join Waitlist Task
Go To: Offers > Join Waitlist
- A Join Waitlist Offer is designed to be an easy way for customers to scan a QR code, enter their name, phone and party size in order to join your waitlist at a particular location.
- When the customer submits the form, if they are already a patron, the system will redirect them to their Points Entry Certificate so they can earn points for their visit.
- If they are not already a Patron, the system will show an appropriate message and then redirect them to the Points-Entry flow for onboarding while they are waiting.
- When their table is ready, your staff can send a text message notification to the customer and mark their record as fulfilled.
In Depth:
Join Waitlist Offer
Demo: See Demo
Related:
Sign-Up Gift Offer
Common Offer Options
Common Offer Options
- The following are various options that are common across different types of offers:
- Featured Items: You can designate certain offers to be included in the Featured Items list on your business page. Purchased offers are only included when their checkout window is available, allowing for seasonal automatic rotation of Featured Items.
- Expiring Soon Reminders: Whenever you set an expiration date, you then have the option to set up to three Expiring Soon reminders.
- Balance/Quantity Remaining Reminders: Send up to three reminders for when customers have a balance or quantity remaining on their certificate to try to encourage a higher redemption rate.
- Free Checkout: You can set an offer to have Free Checkout for everyone or a select group of email addresses.
- Easy Offer Image Selection: Upload your background images to your Media Library first, and then choose the background image for each offer with just a few clicks. You can update the Media Library image later on and it will take effect throughout all your offers that use it.
- Custom Tagging: You can tag patrons with one of your custom tags upon redemption and upon sign up.
- Review Form: You can choose a review form to be sent out each time the customer redeems the certificate.
- Bounce Back After Redemption: Send out a Bounce Back offer after the final redemption of a certificate, encouraging the visitor to come back soon.
- PDF Print Outs: Offers that allow sign ups have an option to create PDFs in various sizes. 8.5x11, 5x7 & 4x6 for table tents, 3.5x2 business cards, 8.5x11 cut into 4 squares or 8.5x11 cut into 9 squares - print in a normal printer and then cut out into squares.
- Custom POST URLs: You can integrate with other services via Custom POST URLs. The system will hit the URL with the patron's info whenever a certain action takes place.
- Advanced Tracking HTML: If you want to utilize social media retargeting or any other type of 'pixel' tracking, you can do so via the Advanced Tracking HTML boxes on offers that allow sign ups.
In Depth:
Common Offer Options
No App Required - Works via Email & Text
- Patrons do not need to download any app in order to access or redeem their certificates.
- All certificates are easily accessible via one click from any email or text message.
- In addition, at the bottom of each email are large, mobile-friendly menu buttons that will automatically log in the patron and take them right to important pages within their account.
- When secure login is required, like when directly accessing your business page when not logged in, patrons can quickly login via a one-time passcode sent to their phone or email.
In Depth:
No App Required - Works via Email & Text

Certificate Redemptions Task
Go To: Offers > Sign-Up Gift > Do Sign-Up as a Patron > Do Certificate Redemption
- Here are three main ways to bring up the certificate redemption page (this can be on the staff member's device or the customer's phone):
- Customer's Device: The customer can get to the certificate page by making a purchase or signing up to an offer for free and then clicking on the link from their email or text message. You can do the redemption their device, but if handling their device is not desired, you can use one of the two 'touchless' options.
- Touchless - Transfer to Staff: Click the Transfer to Staff button on the certificate page, which causes their certificate to be displayed in the Transferred list within the staff member's admin panel.
- Touchless - QR Code Scan: You can scan the QR code on the certificate page, and that will bring up the same page on your phone. Or in some cases the customer may even print out the certificate (especially in the case of receiving an eGift Card via PDF).
- Once the certificate is brought up, the staff member enters the Subtotal (which is also the amount of points that will be awarded) and their Security PIN and submits the form, completing the redemption.
In Depth:
Certificate Redemptions
Related:
Users & Notifications
eGift Card Offer
Certificate Offer
Discount Card Offer
Subscription Box Offer
Sign-Up Gift Offer
Calendar Card Offer
Bounce Back Offer
We Miss You Offer
Give Away Offer
Celebration Offer
Points Entry Offer
Reservation Offer
No App Required - Works via Email & Text

Business Page
Go To: Links > Business Page
- Each account gets its own Business Page, which is essentially a one-stop shop for everything that your customers will need, both when they are logged in as a patron and are not logged in as a visitor.
- Featured Items: When you first hit the Business Page, you'll see the list of Featured Items, which can be automatically rotated based on the season (done via Marketing Blast settings).
- Points & Rewards: When not logged in, customers can access their Points Entry certificate by just entering their email or phone.
- Reservations: Designate a Reservation offer to be used on your Business Page via the 'Featured Item' checkmark.
- Reviews: Optionally show a list of positive reviews left by customers, which can be enabled under Account Settings.
- My Q: If a patron is logged in, they will see a link for 'My Q', which is a list of all certificates that they have access to, via sign ups, birthdays, special offers, purchases, etc..
- Rewards: When logged in, each reward will become claimable when the patron has enough points for it.
- Points History & Purchase History: Shows a complete ledger of all points that have been awarded to their account, and all previous purchases, respectively.
- Account Settings > Business Page Theme: You can set the theme color to match your brand colors, and decide if you want to use light mode, dark mode, or auto, which changes based on the time of day.
- Note: CartQ offers a white-labeled CNAME option for franchises and business groups that allows them to use a custom domain name for all the Business Pages of their members.
In Depth:
Business Page
Demo: See Demo

Predefined Replies Task
Go To: Set Up > Predefined Replies
- If you ever find yourself having to repeat the same answers over and over for customers, you can create predefined replies.
- Predefined replies will show up in various drop-downs so you can quickly chose the right answer with just a couple clicks.
In Depth:
Predefined Replies
Related:
Customer Communications
Text-Us Website Bubbles
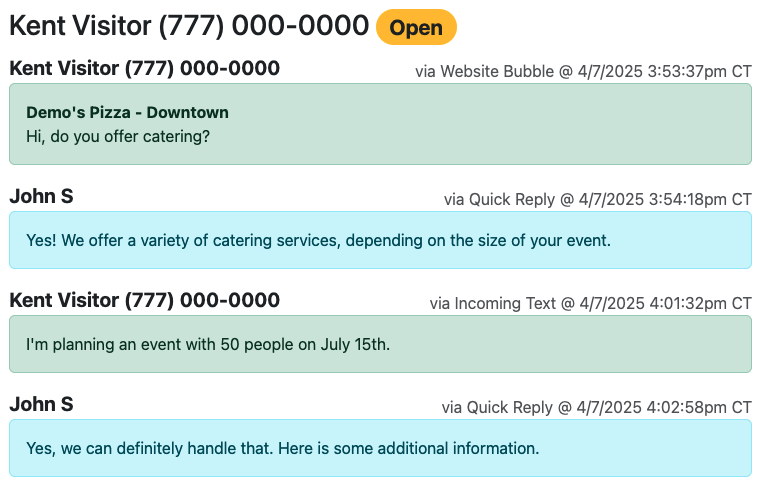
Go To: Set Up > Website Bubbles
- The website bubble is one of the core features of the Communications plan.
- This feature allows you to put a javascript code snippet on your website that will pop open a bubble in the bottom right corner of the screen.
- You can add additional buttons including a rotatable Sign-Up Gift offer, Reservation offer and up to 3 custom buttons so you can link to your online ordering URL, for example.
- Incoming messages are processed by the communications system so you or your staff can take the appropriate action.
In Depth:
Text-Us Website Bubbles
Demo: See Demo

Customer Communications Task
Go To: Links > Communications
- First, create a Text-Us Website Bubble and add the code to your website.
- When visitors click the circle and send the text, they get a confirmation and a new text thread starts on their phone, which is easy and familiar for them - just like texting with a friend.
- During setup, you'll add your staff members as users. When a new message comes in, notifications go out to your staff via text or email.
- Clicking the link in the email or text notification will immediately open the full conversation thread in a browser window where one can reply or reassign.
- From the admin panel, you and your staff have full visibility into every customer conversation.
In Depth:
Customer Communications
Demo: See Demo
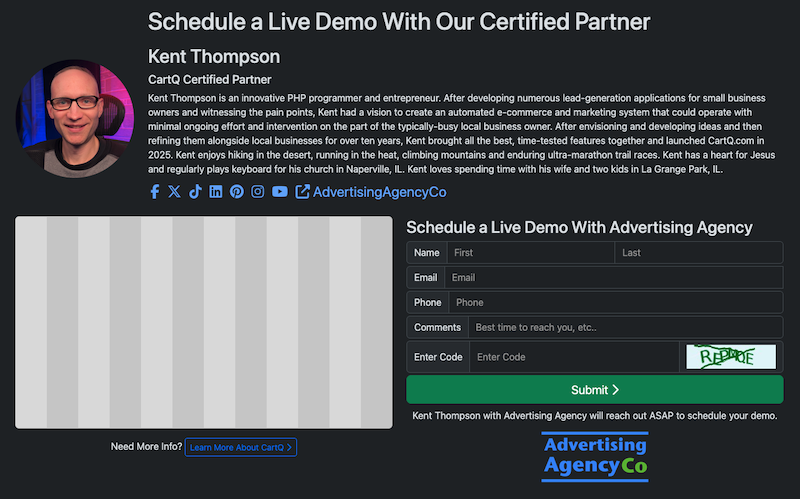
Lead Form Set Up Task
Go To: Leads > Lead Form
- One of the core benefits of the Certified Partner program is the ability to have a personalized lead form integrated into the CartQ website.
- The Lead Form is your chance to tell your story and let prospective businesses know that you are a real person who will take care of them.
- Custom Headlines & Footer: You can customize the headlines, your job title and the footer note.
- Bio Text: This is your chance to tell your story. Try to make the bio as interesting as possible.
- Video Square: Use the default video or your own custom video.
- Custom Email Messaging: Customize the email message going to your lead and your email signature.
- Profile Photo: Upload your Profile Photo by going to User Profile > Profile Photo.
In Depth:
Lead Form Set Up
Demo: See Demo
Lead Management
- In addition to capturing leads through your Lead Form, you can import leads in bulk so you can send a personalized postcard using a postcard mailing service like Stannp.com.
- Before you import, you can optionally set up Lead Statuses, Lead Zones and Lead Groups in order to be able to filter, move and manage leads from external mailings lists you obtain.
- Many mailing services allow you to customize what is printed on each piece, including a custom QR code.
- The system creates a unique URL for each lead called 'Lead Form URL'. This is included in the exported csv file so you can import it into the postcard mailing service.
- This way, when the recipient scans the code, a notification will be sent to you containing the relevant information, and you'll know who has an interest.
- Scanning the Lead Form URL will cookie them so you'll get credited for the sale later if they sign up, and it will redirect them to your Lead Form where they can explore CartQ and hopefully fill out the lead form.
- There are three levels for leads that we can filter on:
- Unconfirmed This means there is no email saved for the lead and they've never scanned their QR code.
- Scanned QR This means that the lead has scanned the QR code at least once.
- Confirmed This means that there's an email address.
- We can 'Reset QR Scans' back to zero by editing a Lead and clicking that button.
In Depth:
Lead Management

Onboarding Clients
- When a lead fills out your Lead Form, you'll get an email notification.
- They will get a confirmation email with your Referral Link in it. You can customize the message and email signature.
- After they sign up with your referral link (or you've linked them manually by adding your Account ID to their Account Settings > Certified Partner page), you're ready to begin onboarding.
- Try to have the business owner complete all the tasks labeled as 'Essentials' (Home > Essentials tab), preferably before you do an onboarding call with them, since that will remove all obstacles to getting them up and running quickly.
- Send Essential Onboarding Tasks Email: Choose that option from the Options list on your Clients page to have the system send them an email with their outstanding Essentials tasks.
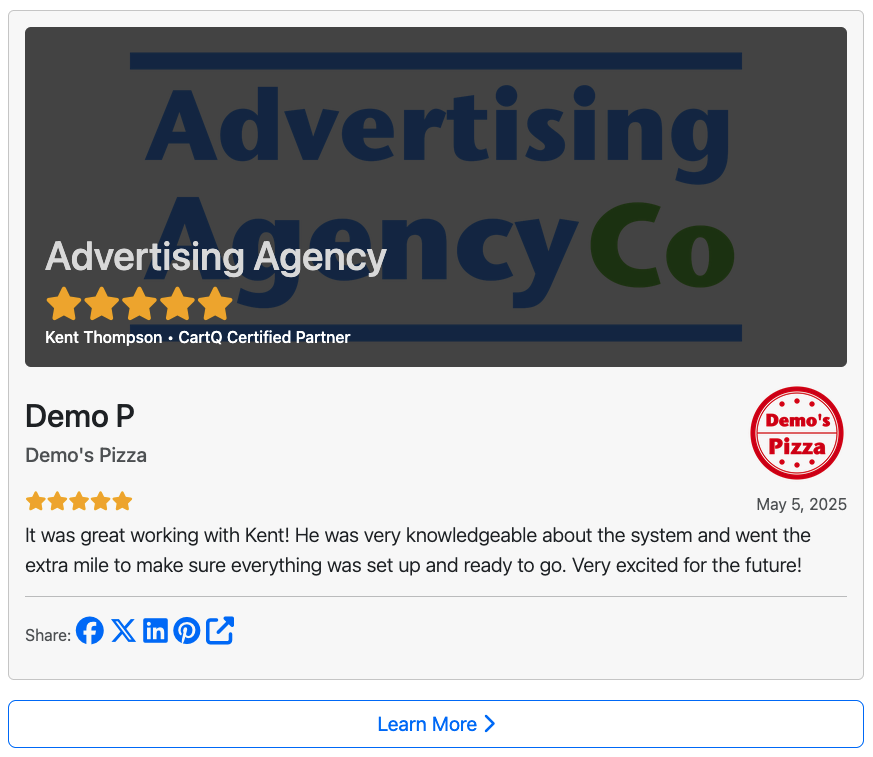
- Send Testimonial Form: Once they are onboarded and you have established a positive relationship with them, you can send them a testimonial form link.
- Share Testimonial: You can view a special page made for sharing the testimonial on social media.
- Testimonials On Your Lead Form: Your 4-5 star testimonials that are authorized to be displayed publicly will be shown on your Lead Form at the bottom to give you credibility.
In Depth:
Onboarding Clients